
Introduction
One question frequently blighting the minds of node runners is how to maintain fast, reliable, remote connections to their nodes and other local devices and services without relying solely on Tor.
This may be relatively simple for those adept with Wireguard; however, many often struggle or can't configure such a setup. Tailscale makes this process extremely simple, has a great user-friendly GUI, and does all the hard work for you.
Note that while Tailscale is "largely open source," their coordination server remains a closed-source project, so it's not perfect; however, you do have the option of replacing this with a fully open-source alternative called "Headscale," which is encouraged by the Tailscale team. Headscale, however, has a more involved setup process and is recommended for more advanced users familiar with the command line and general networking.
I won't be covering Headscale as this article is geared more towards beginners and regular users; however, I will cover Headscale in a future article.
You can install Tailscale on various devices, including Windows, Linux, Android, and iOS, combining them into a mesh-like, encrypted Wireguard network without advanced configurations.
Tailscale is a VPN service that makes the devices and applications you own accessible anywhere in the world, securely and effortlessly. It enables encrypted point-to-point connections using the open-source WireGuard protocol, which means only devices on your private network can communicate with each other.
Installing Tailscale
The first step is creating a free Tailscale account. The signup process is straightforward, using your GitHub account. You can also create an account using Okta, Microsoft, OneLogin, or Google accounts; however, I recommend avoiding them and instead using a GitHub account not linked to your identity.
Once your account is prepared, you can install Tailscale on your local devices. You have two options;
- If you only wish to obtain remote access to a couple of individual devices, you can manually install Tailscale on each device. Using this method, you will only receive remote access to these devices, and all other network traffic remains unaffected.
- If you want full remote access to your LAN, including devices where Tailscale cannot be installed directly, you can configure a single device or container to function as an exit node. This method routes ALL network traffic through the machine, operating similarly to a traditional consumer-level VPN, preventing the need to install Tailscale on multiple separate devices.
Continue following the guide to install Tailscale on specific devices only. If choosing the exit node solution, skip directly to the exit node guide lower down.
Installing on individual Linux devices
The first requirement for Linux-based devices is ensuring that Curl is installed. Many modern Linux distros have Curl preinstalled, but if unsure, run the install command using your system's default package manager. For Debian and Ubuntu-based systems, the command is as follows;
sudo apt install curl -y
The Tailscale installation process is straightforward, with just a single command. This also adds the Tailscale repository for easy future updates.
curl -fsSL https://tailscale.com/install.sh | sh
Once the installation is complete, you will be prompted to start Tailscale with the following command.
sudo tailscale up
When starting Tailscale on a new device, you will be prompted to authenticate it with your Tailscale account. A link will be displayed in the printed output; right-click over the top of it and select "Open Link." This automatically opens a browser where you will need to log in. Select "Sign in with GitHub" and "Authorise Tailscale," which forwards to the device authorization page. Press the "Connect" button to add your new device to Tailscale.
After a few seconds, you will be redirected to your account's "Machines list, "where you will find your device and its new Tailscale IP address. By default, you need to re-authenticate devices every 180 days, but you can deactivate this by selecting the icon to the right with three small dots. You can edit your machine's name from the sub-menu and "disable key expiry," preventing the need to re-authenticate. You can repeat this for as many local devices as required.
Once the local devices are added, you can configure Tailscale on your remote devices. If your remote device is another Linux-based computer, you can follow the same process as above. Still, if your remote device is an Android or iOS, you must install the Tailscale VPN application from the Android or iOS store. Tailscale also offers Windows and macOS applications, which can be found on Tailscale's downloads page.

Once installed, open up the Tailscale application. Log in to your account and authenticate as before. On the main page, you will see a list of all the devices you added previously, and at the top, you will find a toggle switch for activating the VPN. Depending on your device, you may be prompted to confirm the new VPN configuration.
Your remote device is now connected to your Tailscale VPN and can access any of the devices in the list as though they were on your local network. You need to replace the local IP address you would typically use and instead use the unique Tailscale IP assigned to each device. Don't forget to disable key expiry on your Tailscale dashboard for remote devices if required.
This is a simple solution to remote access; however, there is a caveat. Some devices, like Android, only allow a single VPN to be active simultaneously. This means that while the Tailscale VPN is active, non-tailscale traffic will not be covered by a VPN. You could turn Tailscale VPN on and off as required, replacing it with your usual VPN when not needed. Android users could also create a separate user profile specifically for Tailscale use.
Those wanting to route all network traffic, including public internet, through the Tailscale VPN should instead consider configuring an exit node.
Configuring an Exit Node
Installing Tailscale on a single local device and advertising it as an exit node has several advantages. At default, Tailscale only routes traffic between devices connected to the VPN, not interfering with public network traffic; however, when a remote device is connected to an exit node, all traffic is routed through the device, with full LAN access to your entire home network.
Not only does this remove the need to install the VPN on multiple local devices, but you will also have access to devices where Tailscale could not previously be installed manually. Remote computers will function as though local, so connections to devices can be made using their usual local IP addresses.
Any local device capable of installing Tailscale can function as an exit node with reliable power and internet connections. I'll configure an exit node inside an unprivileged Proxmox LXC container in this guide. Still, the steps are identical for any Linux device, minus the container configuration steps.
Preparing the Container
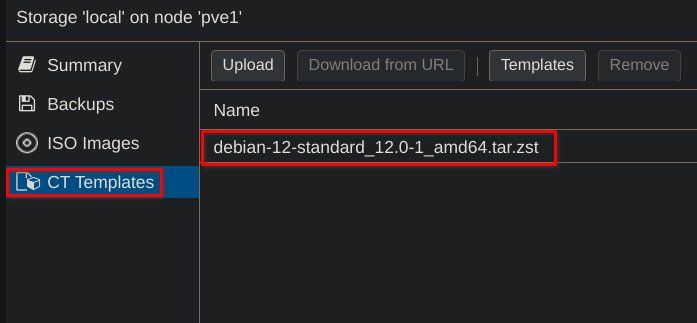
Log into your ProxMox dashboard in the usual manner, and on the left-hand side, under your host, select "local" storage. Select "CT Templates" from the sub-menu and press the "Templates" button. In the menu that appears, search for "Debian 12" and press the "Download" button. The Debian LXC template will now be added to your list of available templates.
At the upper right-hand side of the dashboard, select "Create CT." Follow through the steps one by one as follows;
- General: Add a unique hostname & password. Ensure that "Unprivileged" and "Nesting" are checked.
- Template: Next to "Template," select Debian 12 from the dropdown menu.
- Disks: Set your disk size in GB. 2GB will suffice.
- CPU: Set this to 1 core only.
- Memory: Set both "Memory" & "Swap" to 512MB.
- Network: Next to "IPv4 ", check "DHCP."
- DNS: Leave these fields blank to use the DNS configured at the host level. If you wish to use a different DNS, enter it here.
- Confirm: Review your settings & check "Start after created," then press "Finish."
Setting a static IP
The container will start and be issued an IP address by the DHCP server. You now want to ensure the exit node's IP remains static, so select your newly created container from the menu and select "Console" from the sub-menu. Log in as "root" using the password you created previously.
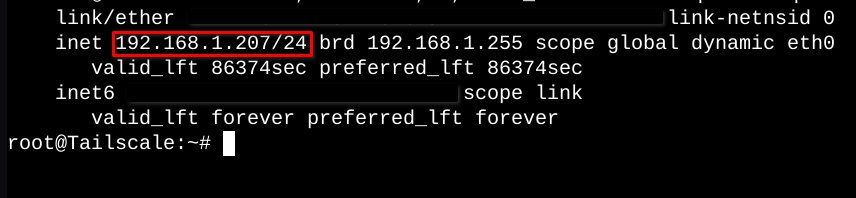
Once logged in, run the following command to obtain the IP address assigned by the DHCP server.
ip a
In the output, below where it says "link/ether, "you will find your IP address. Copy it to your clipboard before continuing.
Now, shut down the container with the following command.
shutdown now
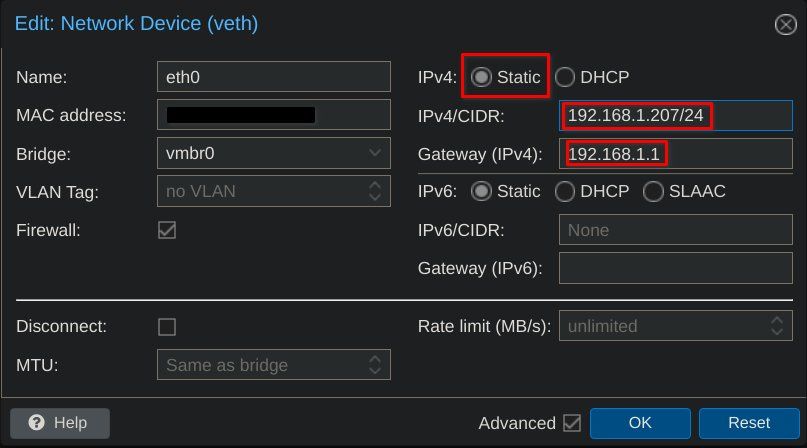
Once the container greys out, select the "Network" tab from the sub-menu. Select the displayed network configuration, then press the "Edit" button.
The network settings menu will appear. Next to the "IPv4" field, check the "Static" box, and in the two boxes directly below, set your IP and gateway addresses. Paste the IPv4 address you previously copied, followed by "/24 ". The Gateway is your router's IP, usually ending with 1. Press OK to confirm.
Right-click your Tailscale container and select "Start" to start it up again, and from the sub-menu, select "Options." From here, edit the "Start at boot" setting to "Yes" to ensure the container automatically starts upon reboot.
Lower down in the sub-menu, select "Firewall" and then "Options." From here, enable the firewall by editing the setting to "Yes."
Next, head back to the console and update the Debian container. Once updated, ensure that Curl is installed.
apt update && apt upgrade -y
sudo apt install curl -y
Configuring the exit node
First of all, install the Tailscale service.
curl -fsSL https://tailscale.com/install.sh | sh
Once the installation is complete, you will be prompted to run the "tailscale up" command to start the service; however, before initiating Tailscale, we need to make a couple more configurations.
First, you need to enable IPv4 and IPv6 forwarding. Open the following file and uncomment (remove the preceding #) from the lines below.
nano /etc/sysctl.conf
##uncomment

net.ipv4.ip_forward=1

net.ipv6.conf.all.forwarding=1
Exit the file with "control+x," confirm the save with "y," and then "enter." Once saved, shut down the container.
shutdown now
You must add a couple of lines to your container's configuration file to ensure the exit node functions inside an unprivileged container.
In the server list on the far left, you will see a container ID number next to your Tailscale container. You need to replace "100" in the command with the correct ID number for your container.
Above your container list, select the host from the menu and then select "Shell" from the sub-menu. Log in as "root" using your host's root password, configured when you initially installed Proxmox. Once logged in, open your containers config file, ensuring you use the correct ID.
nano /etc/pve/lxc/100.conf
Once open, scroll down to the following free line and paste in the following.
lxc.cgroup2.devices.allow: c 10:200 rwm
lxc.mount.entry: /dev/net/tun dev/net/tun none bind,create=file
You can now save and exit the file.
Launching the exit node
Now that the container has been correctly configured, we are ready to launch Tailscale. From the server list on the left, select your Tailscale container and select "console" from the sub-menu.
When launching Tailscale, you must also enable subnet advertising and exit node functionality. Ensure you edit the local IP address in the start command if it differs from yours, but ensure it ends with a "0 ".
tailscale up --advertise-routes=192.168.1.0/24 --advertise-exit-node
A link will be displayed in the output. Opening the link in a browser will prompt you to log in to your Tailscale account. Select "Sign in with GitHub" and "Authorise Tailscale, "which forwards to the device authorization page. Press the "Connect" button to add your exit node to Tailscale.
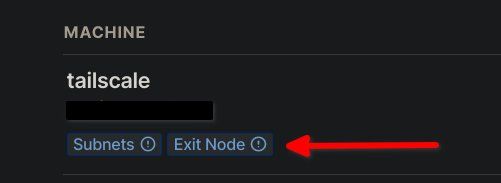
Once added, you are redirected to your Tailscale machine list. Under your newly added node, you should see the "Subnets" and "Exit Node" labels as in the image above. Note the exclamation marks; this means that they still need enabling from within the Tailscale dashboard.
To the right of your node, select the icon with the three dots to bring up a sub-menu. First, select "Disable key expiry" to prevent the need to reauthenticate every 180 days.
Next, select "Edit route settings" from the same menu and enable both options from the popup.
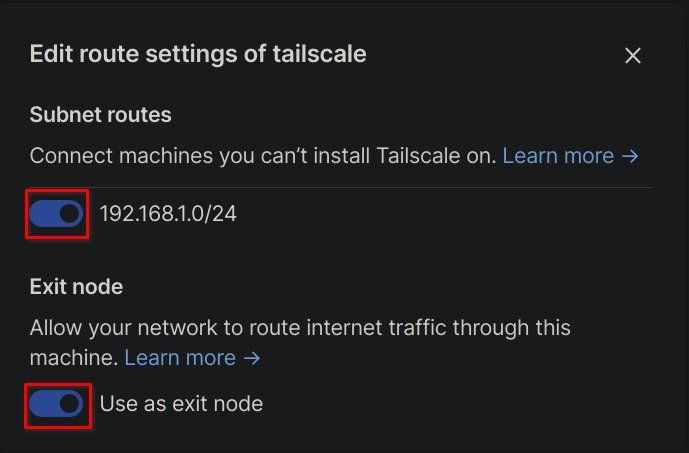
And that is it; your exit node is now fully operational.
Connecting remote devices
You can now connect any remote device to your local network with Tailscale installed.
Suppose your remote machine is a Linux-based computer. In that case, you can connect using the following command, ensuring you edit the exit node IP to match the Tailscale address displayed next to your exit node on your Tailscale dashboard.
If logged in as a user other than root, you must include "sudo" at the start of the command.
tailscale up --exit-node=100.110.108.76 --exit-node-allow-lan-access=true --accept-routes
If connecting an Android, iOS, Windows, or Mac device, download the Tailscale application for your device, and once connected, select "Use exit node" from the settings menu and choose your exit nodes hostname from the list, not forgetting to also check the "Allow LAN access" box before exiting.
You should now be able to ping any local IP address on your exit nodes network remotely and access all nodes, services, and media servers.
Installing Tailscale on Fedora Silverblue
Due to the immutable nature of Fedora Silverblue, the steps to install Tailscale are pretty different and not covered anywhere in Tailscale's documentation pages.
Thankfully, Tailscale is easily installed on this immutable operating system using "rpm-ostree ". Once you successfully install Tailscale, it can be operated normally using the same commands as non-immutable operating systems.
First, add the Tailscale repository.
sudo wget https://pkgs.tailscale.com/stable/fedora/tailscale.repo -P /etc/yum.repos.d/
Once the repo is added, you need to deactivate "repo_gpgcheck" & "gpgcheck" by editing "tailscale.repo" and flagging both options with "=0 ".
sudo nano /etc/yum.repos.d/tailscale.repo
You can now install Tailscale using rpm-ostree layering.
sudo rpm-ostree install --apply-live tailscale
Run the following commands to start the Tailscaled service and ensure it starts on boot.
sudo systemctl enable tailscaled
sudo systemctl start tailscaled
Tailscale should now be running. You can confirm its status with the following command.
sudo systemctl status tailscaled
You can now authenticate your device as usual.
sudo tailscale up
If you're connecting the device to an exit node, you can start Tailscale with the following command, obviously replacing the IP address with your exit node's Tailscale IP.
tailscale up --exit-node=100.110.108.76 --exit-node-allow-lan-access=true --accept-routes
Exit Node Double VPN
As an added level of privacy, you could also choose to configure a consumer-level VPN, such as Mullvad, and configure it to cover your exit node's local IP address. For best results, I recommend configuring this at the router level; however, you could also install it directly on the node via Mullvad CLI.
Doing this will pass all network traffic through the Mullvad VPN, including any remotely connected devices, and create what is essentially a double VPN.
Thanks for taking the time to read. For more detailed information, check out the Tailscale documentation website for any questions or issues.


