
Introduction
Proxmox Virtual Environment (VE) is an open-source server virtualization management solution that allows you to create and manage multiple virtual machines on a single physical server. It is a fantastic tool for both business and home lab use.
This guide will take you through the installation, configuration, and setup of Proxmox VE.
Prerequisites
- A dedicated server or a computer with at least one modern CPU (Intel or AMD).
- 8 GB RAM and 20 GB hard disk space.
- A valid internet connection to download the Proxmox VE ISO and for updates.
- Basic knowledge of Linux command-line operations and networking.
- ISO image of Proxmox VE, downloaded from the official Proxmox website.
- An adequately sized USB flash drive.
Preparation
After downloading the Proxmox ISO image, the first step is to create a bootable USB. I recommend downloading Balena Etcher as it's open-source and available in various formats, including AppImage, dmg, exe, deb & rpm.
Once your bootable media is ready, please insert it into your server or computer and boot from it. Depending on your system, you might need to adjust the boot order in the BIOS or use the boot menu option. This is most commonly F12 or F2 but varies from system to system.
Installing Proxmox
After successfully booting from the Proxmox VE installation media, you will be presented with the Proxmox VE installer.
- Welcome Screen: Click "I agree" to the terms and conditions.
- Installation Target: Select the hard disk where Proxmox VE should be installed.
- Country and Timezone: Select your country, timezone, and keyboard layout.
- Management Password: Provide an email address and set a strong password. These credentials will be used to log in to the Proxmox web interface.
- Network Configuration: Enter your desired hostname and your server's IP address. The installer also asks for a gateway and DNS server. This is often automatically prefilled. For your hostname, I recommend using "pve1.local", numbering according to each new node you add.
- Once you've filled in all the necessary information, click "Install" to start the installation process.
The installation typically takes 10 minutes, depending on your server's hardware capabilities. After the installation, remove your installation media and restart the system.
Access Proxmox WebUI
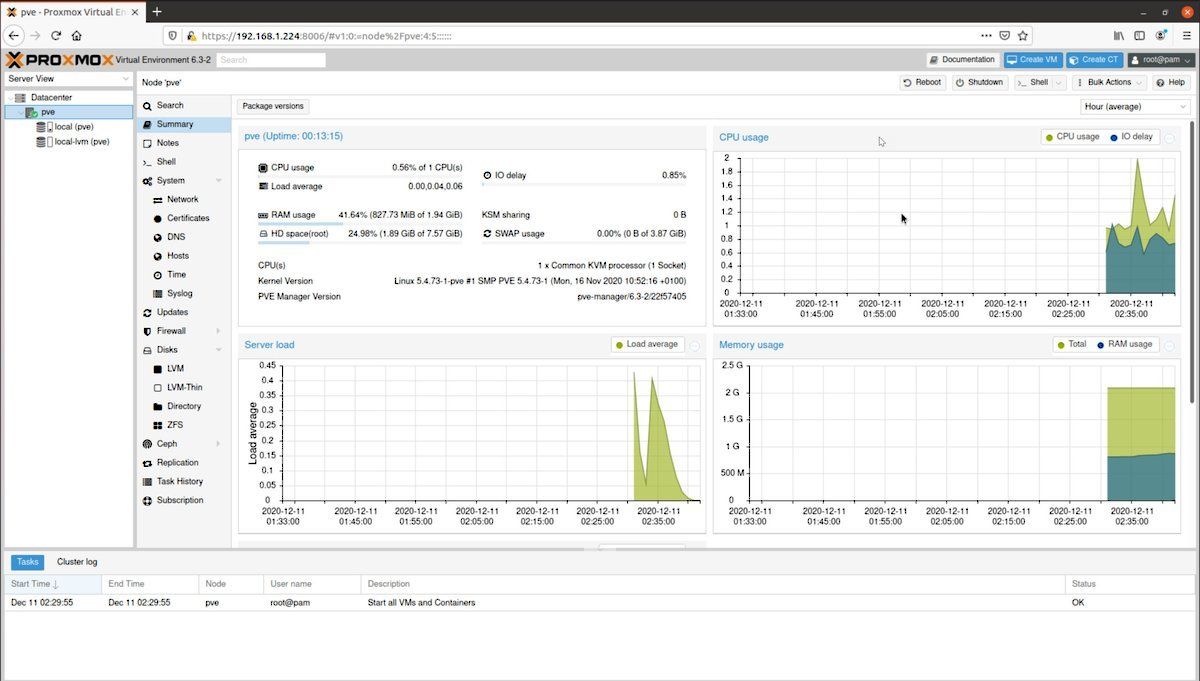
The Proxmox VE interface allows you to manage virtual machines, containers, clusters, storage, networks, and system tools.
From a web browser, navigate to your Proxmox GUI by entering the local IP address of your host, followed by the port number "8006."
For example;
https://192.168.1.100/8006
Log in as "root" using the password you created during the installation.
Before you start creating VMs, performing some initial configuration is necessary.
- Subscription Message: You'll see a subscription nag when logging in. Proxmox VE is free, but the company offers subscription plans for enterprise users that provide access to stable updates and technical support. You can dismiss the warning message if you don't plan on purchasing a subscription.
- Network Configuration: Navigate to "System"> "Network" to review or change your network settings.
- Update Your System: Navigate to "System"> "Updates" and install any available updates to ensure you're running the latest version.
- Configure Storage: Under "Datacenter"> "Storage," you can add and manage storage for your VMs and containers.
Post-Install
The following script allows you to configure your Proxmox VE repositories, including;
- Disabling the Enterprise Repo if you're not using a paid license.
- Adding or correcting PVE sources.
- Enabling the No-Subscription Repo.
- Adding the test Repo.
- Disabling the subscription nag on login.
On the left-hand side, you will find your server list. Select "pve1", then select "Shell" from the sub-menu. Log in as "root" and run the script.
bash -c "$(wget -qLO - https://github.com/tteck/Proxmox/raw/main/misc/post-pve-install.sh)"
Answering "yes" (y) to all options presented during the process is recommended.
Creating a Non-root User
Using a non-root user for management tasks is always good practice in any production environment. This reduces the risk of accidental changes that can affect the entire system.
Here's how you can create a non-root user;
- Create User: Navigate to "Datacenter"> "Users." Click on "Add" to open the Create user dialogue. Enter a username, password, and email for the user.
- Assign Permissions: Navigate to "Datacenter"> "Permissions." Click on "Add" to open the add permissions dialogue. Here, you can set permissions for the new user. Choose the user you just created, select the role (PVEVMAdmin, for example, allows full access to VMs and containers), and select the path ("/" for all).
Now, you can log out and log back in again as your new user. If required, you can always change the permissions later.
LXC Containers
Linux Containers (LXC) provide lightweight virtualization that lets you run multiple isolated Linux systems (containers) on a single host. Proxmox VE has integrated LXC support, making creating and managing LXC containers easy.
Here's how you can create an LXC container;
- Download an LXC Template: Before creating an LXC container, you need to download an LXC template. Navigate to "pve1"> "local (pve1)"> "CT Templates"> "Templates". A list of available templates will be displayed. Select your preferred template and click "Download".
- Create an LXC Container: Navigate to the Proxmox web interface's main page and click "Create CT" (CT stands for container).
- General Settings: Enter the container's ID, hostname, and password. You can leave the resource pool as "No Pool" and the storage as local-lvm. It's recommended to leave "unprivileged" and "nesting" checked.
- Template: Select the template you downloaded earlier.
- Root Disk: Specify the size of the root disk. The default is usually enough for most uses.
- CPU and Memory: Specify the number of cores and the memory size.
- Network: Configure the network settings. You can leave it as DHCP if your network has a DHCP server.
- Confirm Settings: Review all the settings and click "Finish" to create the container.
Your container will be created and listed in the Proxmox web interface. You can start, stop, and manage the container directly from the interface.
Remember that LXC containers share the same kernel as the host, so they should all be Linux-based. To run a non-Linux operating system, you must create a whole virtual machine (KVM) instead.
Proxmox Virtual Environment is a complete open-source platform for enterprise virtualization. With the built-in web interface, you can easily manage VMs and containers, software-defined storage and networking, high-availability clustering, and multiple out-of-the-box tools using a single solution.
Virtual Machines
Download an ISO
Before creating a VM, you must have an ISO image of the operating system you want to install on the VM. You can usually download these from the operating system vendor's website.
Once you've obtained the ISO image, upload it to Proxmox. Navigate to "pve1"> "local (pve1)"> "ISO Images" and click "Upload." Browse the ISO image file on your computer and upload it.
Open the VM Wizard
From the Proxmox web interface, click "Create VM" in the upper right-hand corner. This will open the New VM wizard.
Configure the VM
The VM wizard will guide you through setting up your VM.
- General: Here, you must provide a name for your VM. An ID will be automatically generated, but you can change this if you like.
- OS: Click "ISO image" and select the ISO you uploaded earlier. If installing a Linux distribution or Windows, you can leave the guest OS on "Other."
- System: Choose your BIOS type. If you're unsure, leaving it on the default value is safe.
- Hard Disk: Choose your Bus/Device. If unsure, "VirtIO SCSI Single" is generally a good choice. For storage, choose the location where you want your VM's disk image to be stored & enter the hard disk size you want for the VM.
- CPU: Enter the number of sockets and cores you want to allocate to your VM.
- Memory: Define how much memory to allocate to your VM.
- Network: Leave it to defaults unless you have a reason not to.
After configuring these settings, click "Next" to review your configuration. If everything looks good, click "Finish."
Install the OS
After the VM is created, it will appear in the server view. Click on the VM, and then click "Start" at the top of the screen.
To open the console, click on "Console" from the sub-menu. The console allows you to interact with your VM as if sitting in front of its monitor.
At this point, you should see the installer for the operating system that you've chosen. You can install the OS just as you would on a physical machine.
Summary
Setting up a virtualization environment requires practice. Don't hesitate to experiment with different settings and configurations. Feel free to explore and learn.
Following this guide, you should now have a functional Proxmox VE setup and have created your first container and virtual machine. If you encounter issues or need advanced configurations, the Proxmox community and the Proxmox VE documentation sites are excellent resources for further learning and troubleshooting.


