Introduction
Running your own personal Monero node provides many benefits over using a public node. Not only will you be helping to improve the network's decentralization, stability & efficiency, but you will also be removing layers of trust by broadcasting your own transactions. Minimizing trust & increasing privacy are the primary reasons for operating a node.
Single board computers are great for running an XMR node since they provide a simple, reliable, "set and forget" solution instead of leaving your laptop or desktop computer running 24/7.
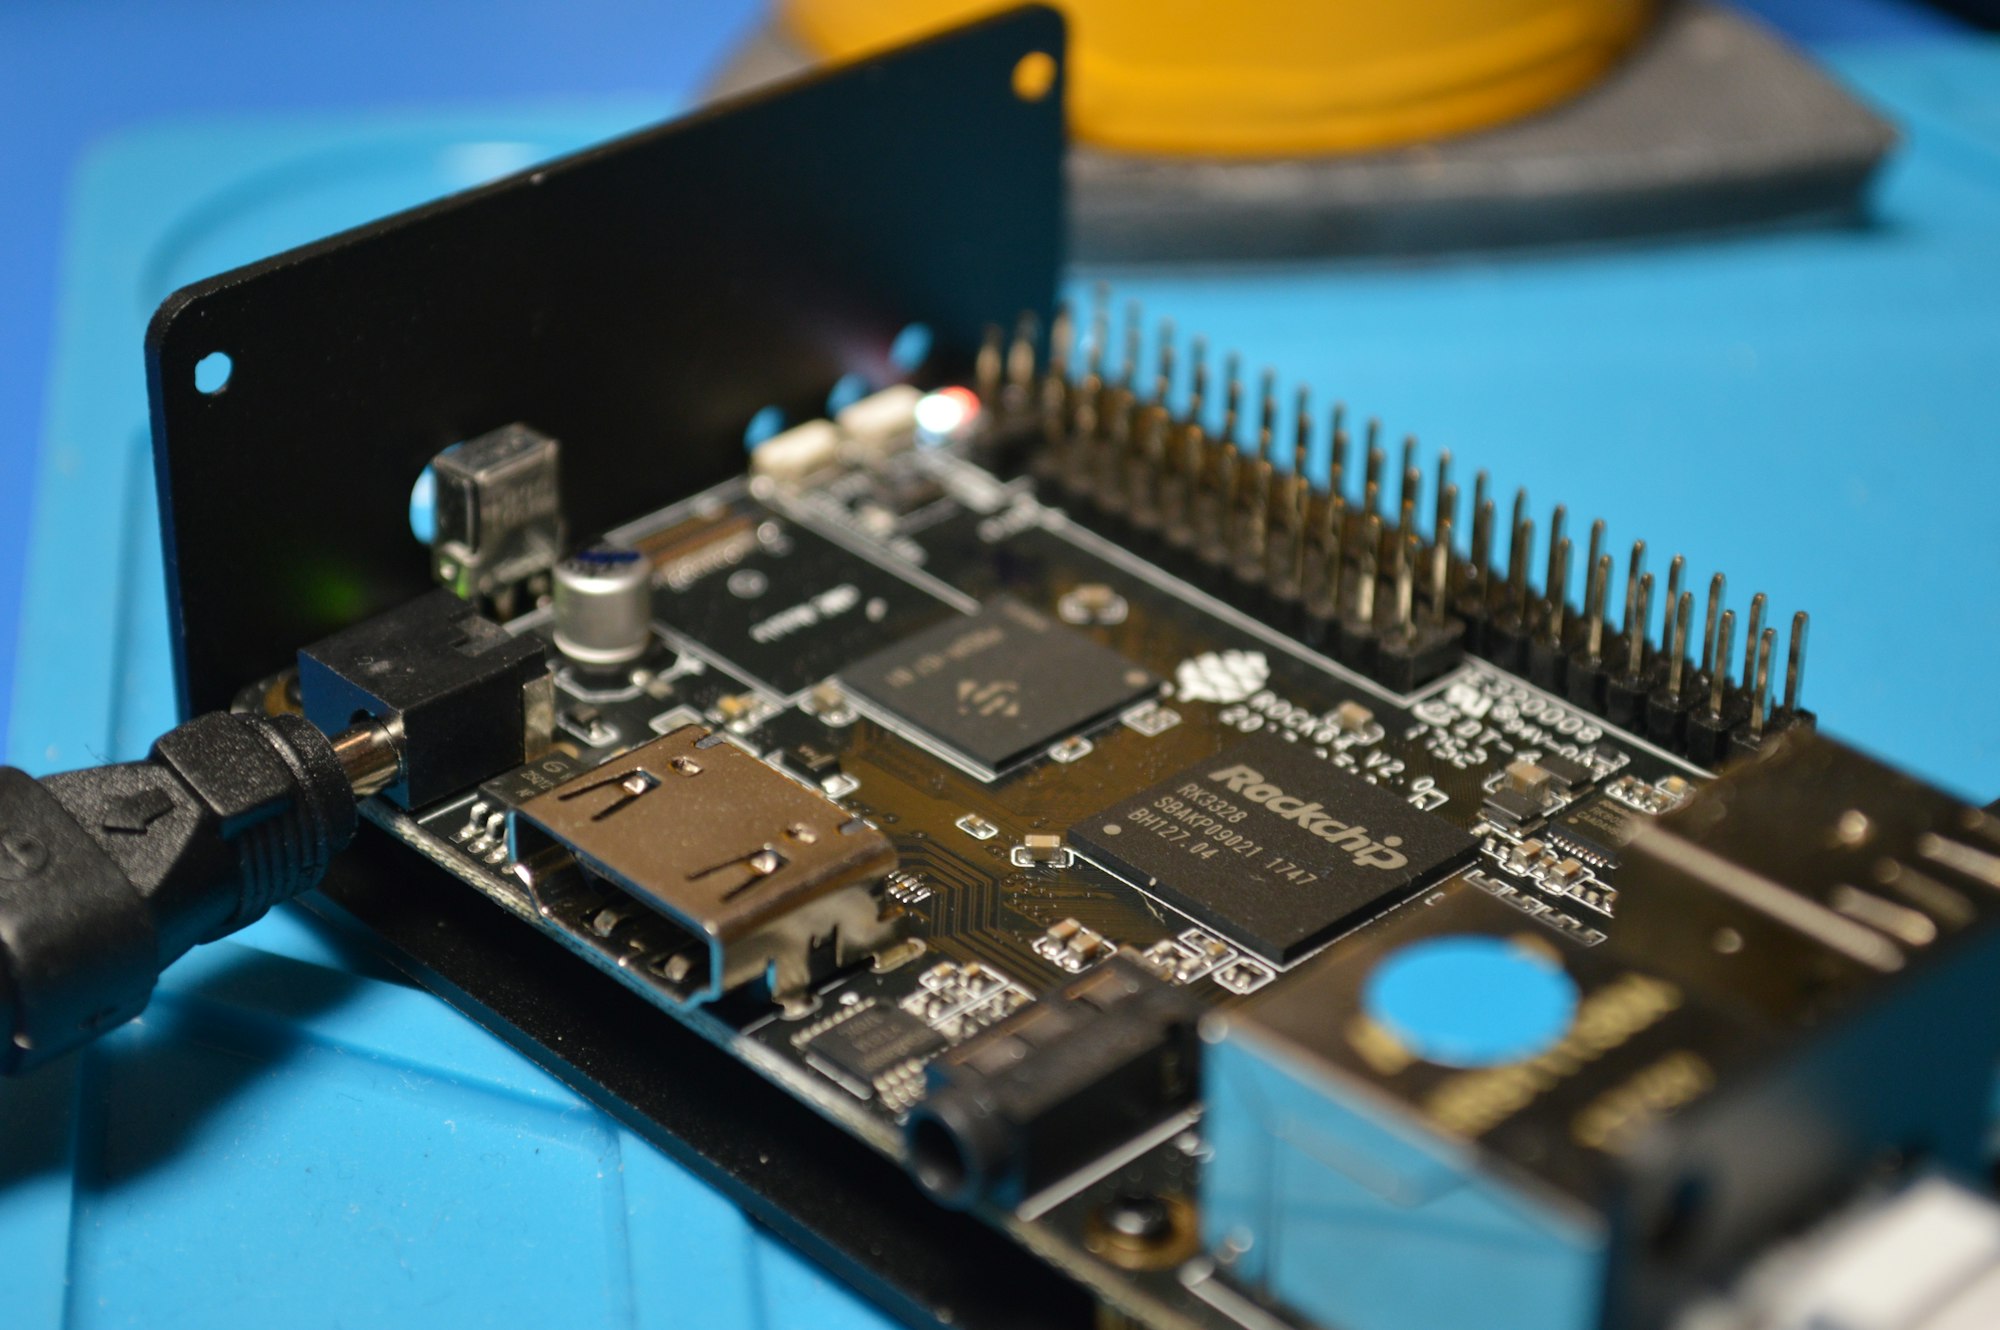
The RockPro64's integrated PCIe x4 slot & NVMe SSD provide a tidy & efficient alternative to using ugly, external, USB-connected hard drives.

Due to the smaller footprint of the Monero blockchain, a 1TB NVMe is more than enough storage to future-proof your node; however, smaller will also suffice, depending on the size of the blockchain at the time you read this.
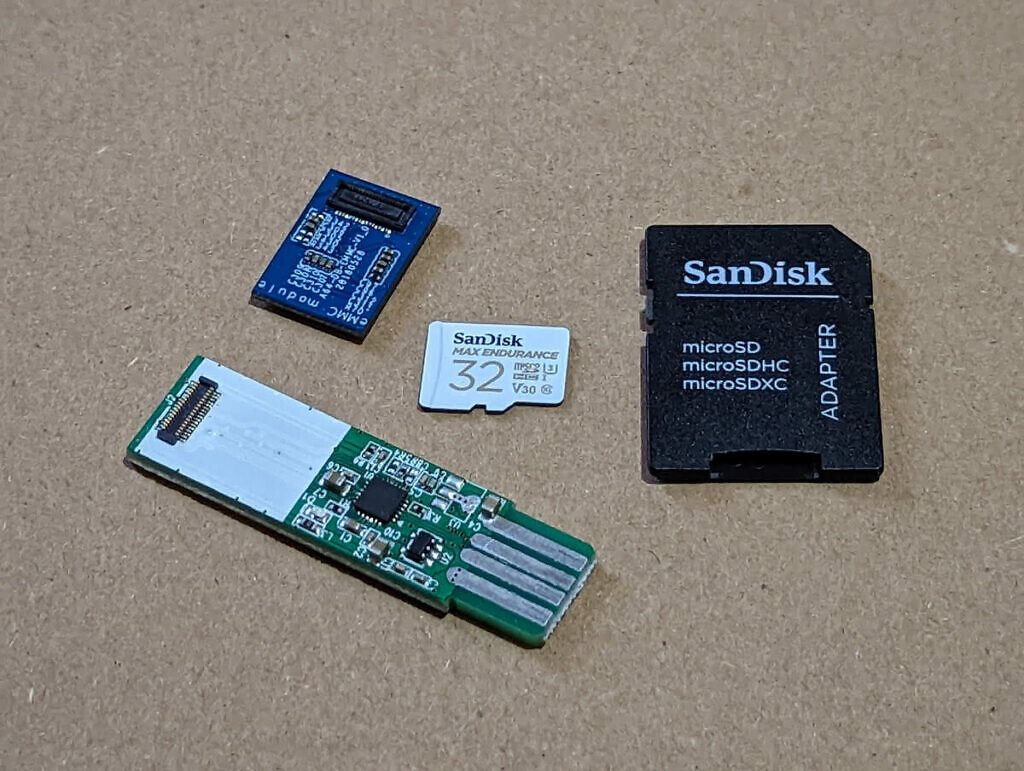
With the RockPro64, you also have the option to use an eMMC module instead of a MicroSD. I also chose to add a heatsink to my NVMe drive for improved cooling. While tests have shown that this is not necessarily required, I figured it couldn't hurt.
Thanks to the brilliant work of the open-source PiNodeXMR project, setting up a reliable XMR node has never been easier. PiNodeXMR is the software you will be using to run your XMR node.
Installation Process
First, flash your MicroSD or eMMC with the PinodeXMR image. Head over to PinodeXMR's downloads page & scroll down to the RockPro64 Image. Download & flash it to your card using Balena Etcher. A 16GB eMMC or MicroSD card would probably suffice; however, I'd recommend a 32GB as they aren't any more expensive and will provide more space as the PiNodeXMR project grows.
Once the writing is completed, insert the MicroSD, or eMMC, into your RockPro64, attach the ethernet cable first, then connect the power lead. Once the RockPro64 powers up, please leave it to sit for 5 minutes while the PiNode image installs.
After a few seconds, the fan will begin to spin & will remain on until we initialize the fan script later in the guide.
Next, we need to find your RockPro64's local IP address. You can use tools like Angry IP Scanner to search your network; however, I prefer logging into my router's admin page instead so I can permanently bind the IP to my RockPro64 as a static address.
Once you have your IP address, open a web browser and type it into the address bar. If using HTTPS, you may see a "site not secure" warning; just hit "'continue to site, "& the browser will present you with the PiNodeXMR dashboard. Create a bookmark for easy access later.
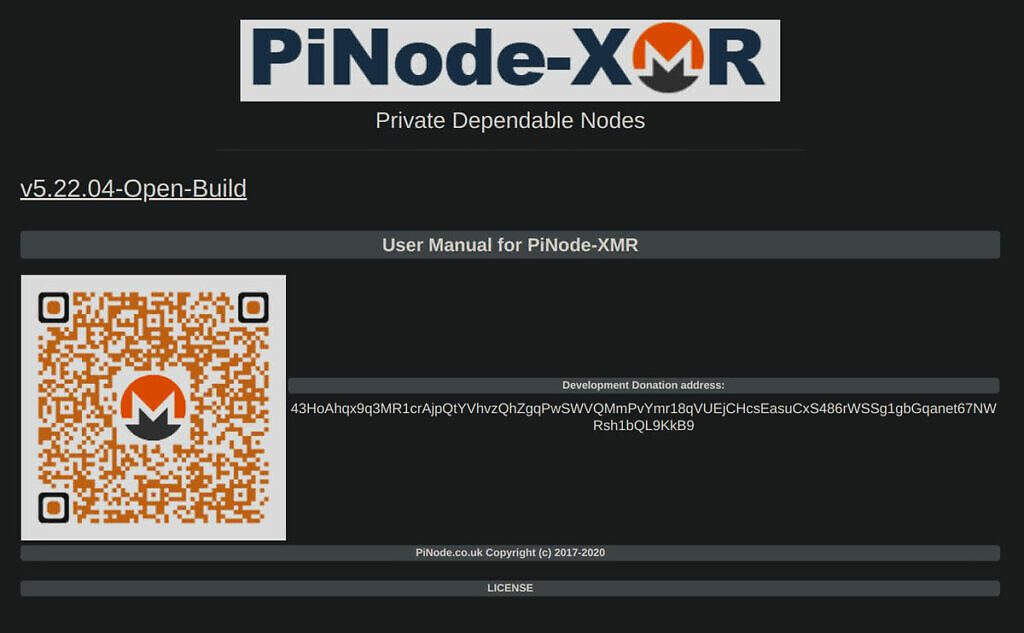
Above the PiNodeXMR logo, you will see a "Web Terminal" button. This is a web-based SSH client for your node.
From the terminal, edit the following command to match your RockPro64's local IP address and enter it.
ssh [email protected]
Your default login credentials will be:
- USERNAME: pinodexmr
- PASSWORD: PiNodeXMR
After a few seconds, the PiNodeXMR settings menu will appear. The most crucial step before anything else is to change the SSH password from its default for security purposes.
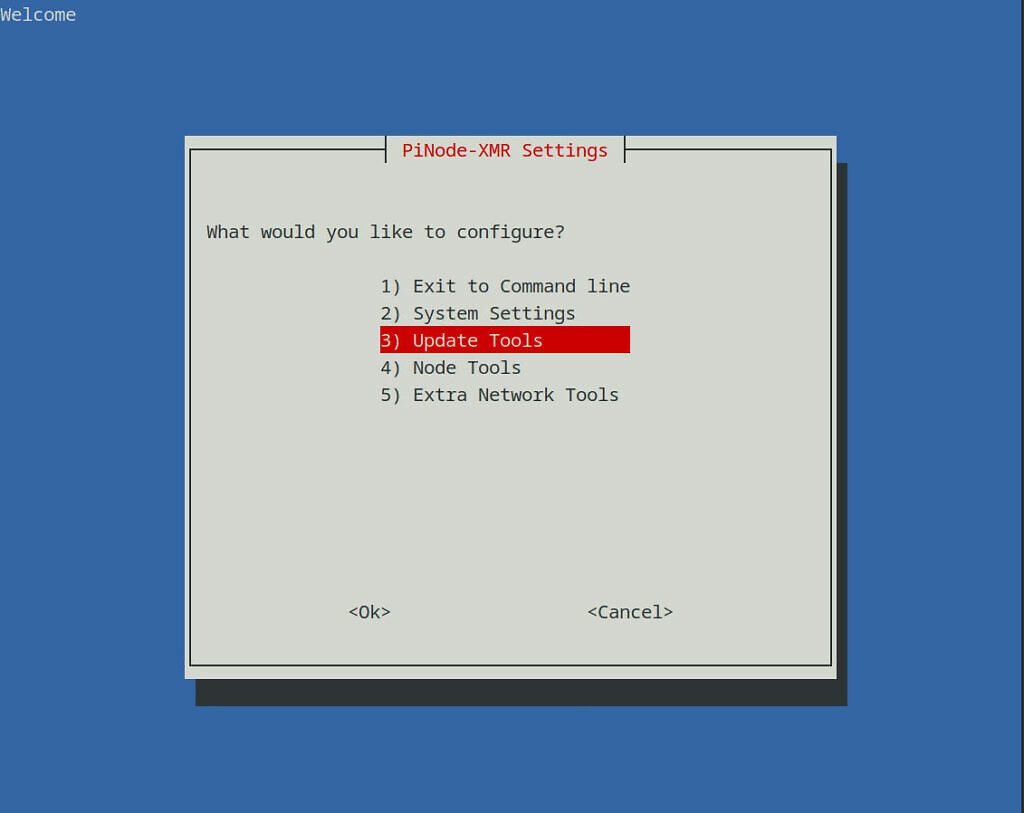
Scroll down to "System Settings" using the arrow keys, then select "Master Login Password Set" on the following screen.
Follow the prompts until you are asked to enter a new password, then, ensuring you don't use any special characters, type it in twice. Your master password will now update & you'll be returned to the menu. This password is now required for all future SSH access.
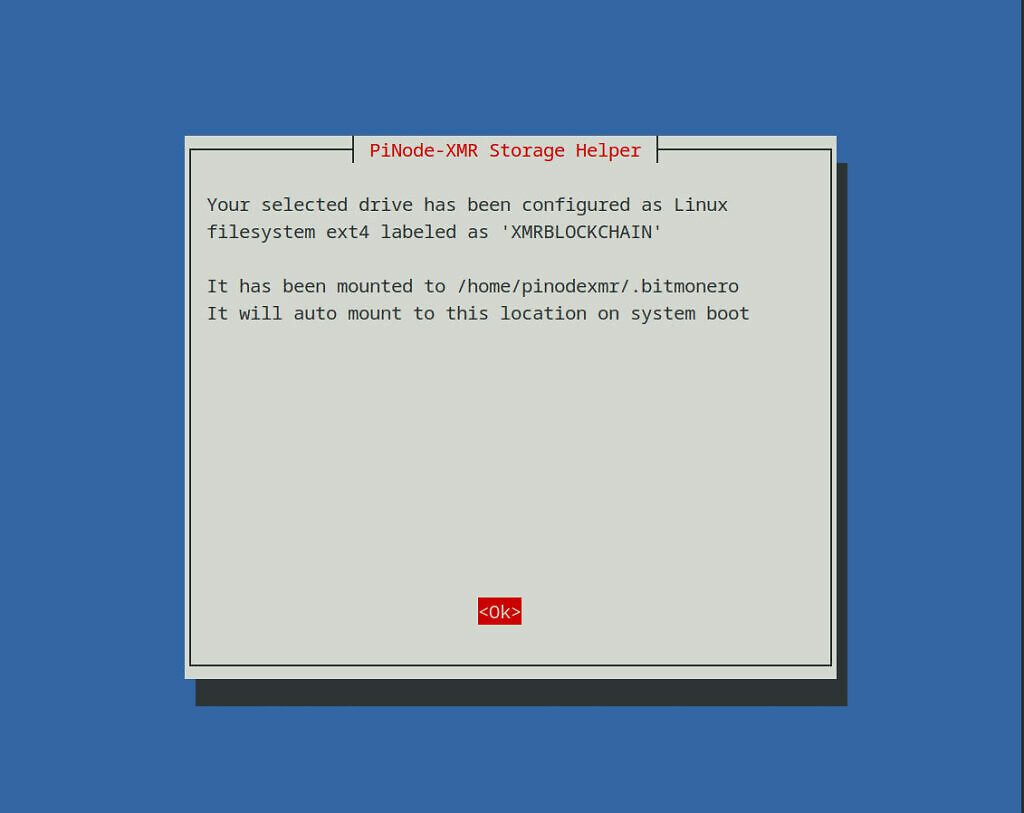
Next, you must select your NVMe drive as the primary storage location for block data. From the menu, select "System Settings, "& from there, select "USB Storage Setup. " Your NVMe should already be attached, so choose "Yes" to continue. You will now see a list of available drives; scroll down and select "nvme0n1 ".
On the following screen, select "Yes" to format & prepare the drive for blockchain storage. Instruct the helper to format the drive using the "EXT4" filesystem when prompted. Once complete, the NVMe will be mounted & ready for block download.
Next, you want to ensure that PiNodeXMR & all dependencies are updated to their latest versions. From the main menu, select "Update Tools" & ensure that "System Packages & dependencies, ""PiNodeXMR, "& "Blockchain Explorer" are all updated.
Once these three updates are complete, you can enable the fan script. The "Active Thermal Fan" script will activate the fan only when required, adjusting speed based on device temperature. You can read more about the ATS fan script on GitHub.
From the main menu, select "System Settings" & then "PWM Fan control Tool ". ATS will install & after a few seconds, you will notice that the fan slows down or stops entirely. The temperature-controlled PWM fan service is now active. You can double-check the status of ATS by running the following command:
sudo systemctl status ats
Next, you need to configure your RPC credentials for external wallet connections. Select "System Settings" from the main menu, then "Monero RPC Username and Password setup ". You will be prompted to enter the RPC username & password of your choice. Don't use any special characters & keep these credentials safely backed up.
Now, let's add password protection to your PiNode web interface dashboard. Select "Extra Network Tools" from the main menu, then "Web Interface Password ". On the following menu, select "Set Web Interface Password" & enter a unique, secure password, avoiding the use of special characters once again.
Once the password is registered, return to this same menu & select "Enable Web Interface Password ". Once enabled, the username "pinodexmr" & your new password will be required whenever accessing the web interface.

Before exiting settings, return to the main menu & select "Extra Network Tools ", then select "Install Tor ". This installs a Tor daemon & provides your node with a unique onion address for anonymous connections to the Monero network.
You can return to your web interface using your local IP address or "pinodexmr.local ". Log in when prompted & select "Node Control" from the top menu. From this screen, you can start Monderod and begin synchronizing block data.
Scroll down to where it says "Anonymity Networks" & select either the Private or Public node option, depending on which you intend to run. Once an option is selected, the tab will expand, displaying your node's personal Tor address & the button required to start & stop Monerod.
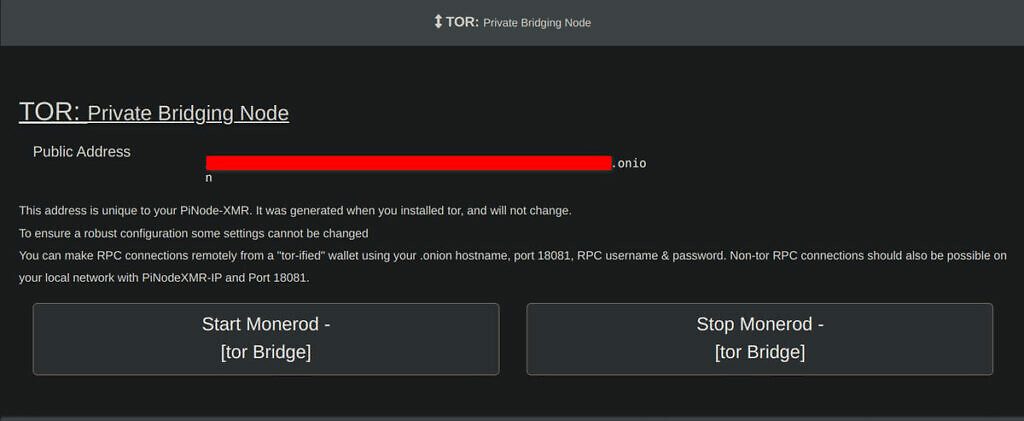
You do not need to manually open ports with a Tor connection, so you can now hit "Start Monerod" to begin synchronization. Now, clear your web browser's cache & close it down. The sync will typically take 24-48 hours, depending on the quality of your connection. I advise leaving the node during the sync process, as messing around with settings too much during sync can cause problems.
If you wish to operate a private node for your use only, clearnet connections are also acceptable & will provide a smoother, more efficient wallet experience. Monero's Dandelion++ provides great transactional, network-level privacy by default, so Tor is not necessarily required unless you have specific reasons.
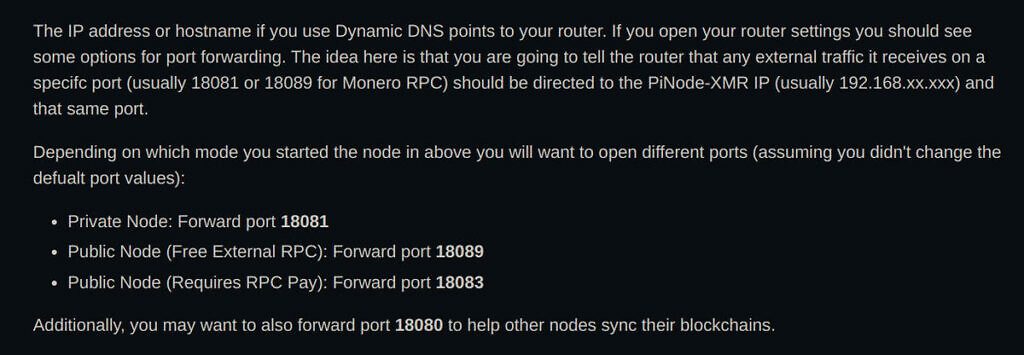
Using clearnet will require you to forward TCP port 18081 for remote RPC connections. You could also forward TCP port 18080 (P2P) to help others sync their nodes & strengthen the network. I recommend configuring a VPN for clearnet connections, either at the router level or using the included PiVPN plugin, available to install under "Extra Network Tools."
For remote clearnet connections, creating a free dynamic DNS hostname on noip.com is worthwhile if your network's public IP address changes frequently. You can install the noip package under "Extra Network Tools" in the SSH settings menu. The installer will ask for your noip login credentials & will provide a reliable static hostname for uninterrupted remote connections.
The advantage of Tor connections is that you don't have to worry about dynamic DNS or port forwarding. Your static onion address will provide a remote connection, regardless of your network environment. The tradeoff is that Tor is less efficient & may occasionally encounter instability. You must also ensure that the Monero wallet has a built-in Tor client; if not, you must install Orbot VPN on the device.
Which you choose is personal; however, if you plan to make the node public, I recommend using Tor. If you use a clearnet connection, follow the same steps as above, but start Monerod under the "Clearnet Networks" heading.
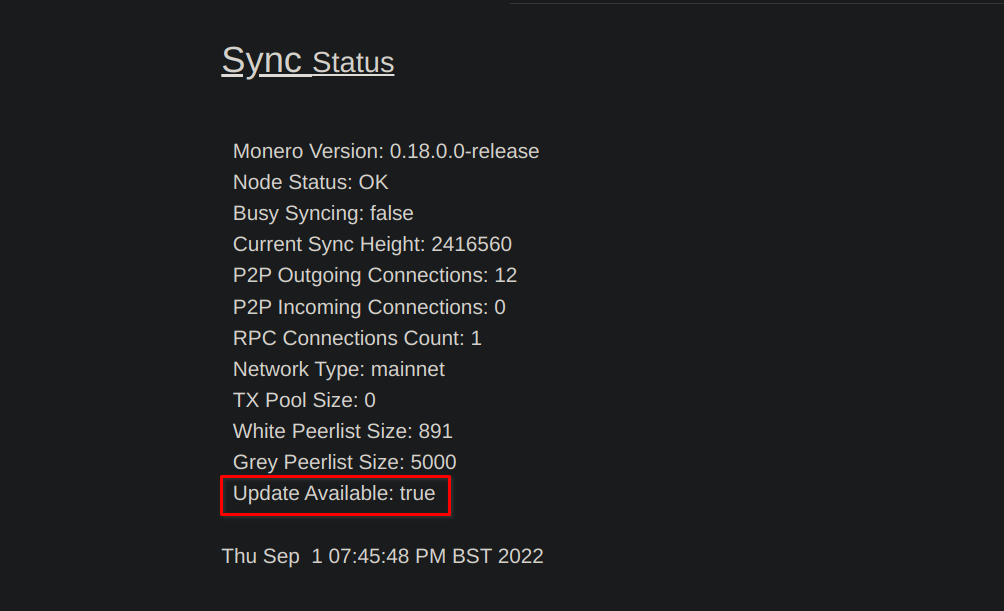
Once the block download is complete, check if an update to Monero is available. If you see "Update Available: true" on your status dashboard, Monero must be updated before doing anything else.
Select "Web Terminal" from the dashboard menu or SSH with your preferred software & select "Update Tools. "Select the first option, "Update Monero. "This is a significant update & will take a couple of hours to complete.
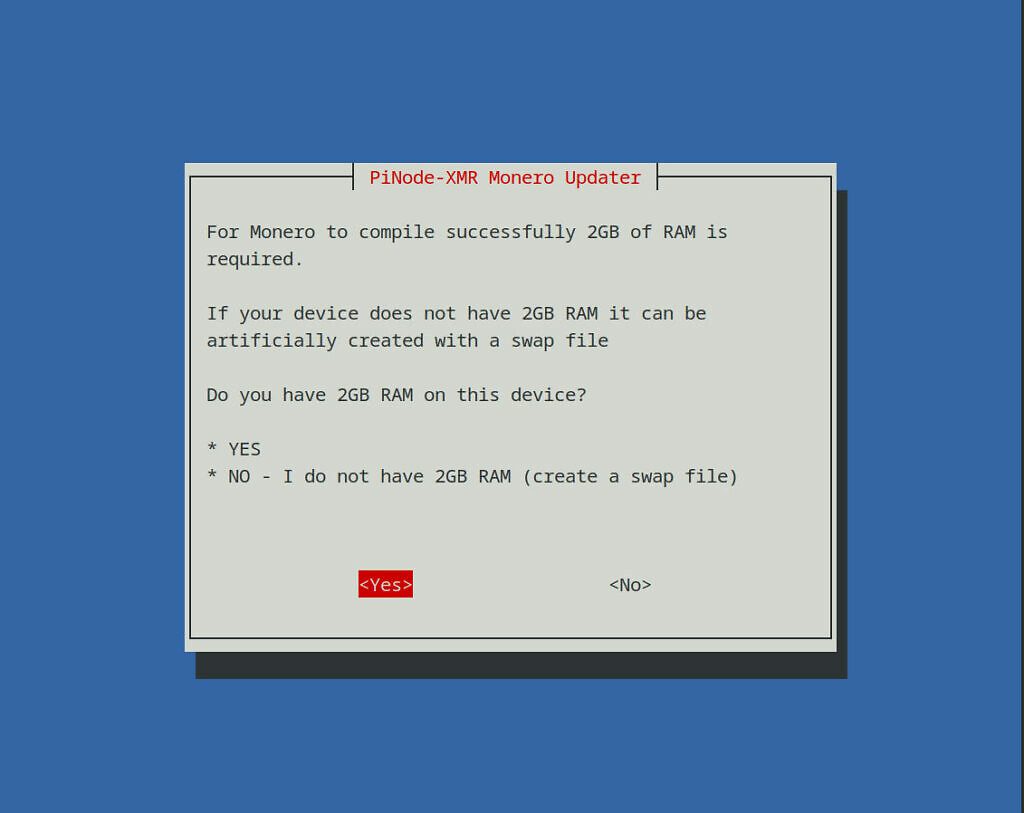
Before the update begins, you're asked whether or not your device has 2GB of memory available. The system can artificially create more memory using a swap file, but since your RockPro64 has 4GB of LDDR4 memory, you can select 'Yes 'from the menu to continue.
Now that Monero is updated, you can connect your wallet. A great wallet to start with is Monerujo, which I can highly recommend. Once you have configured a wallet, you can add your node using the RPC username & password you created earlier & either your Tor onion address, noip hostname, or your network's public IP address, depending on which method you used. Your wallet should immediately begin to synchronize data from your node.
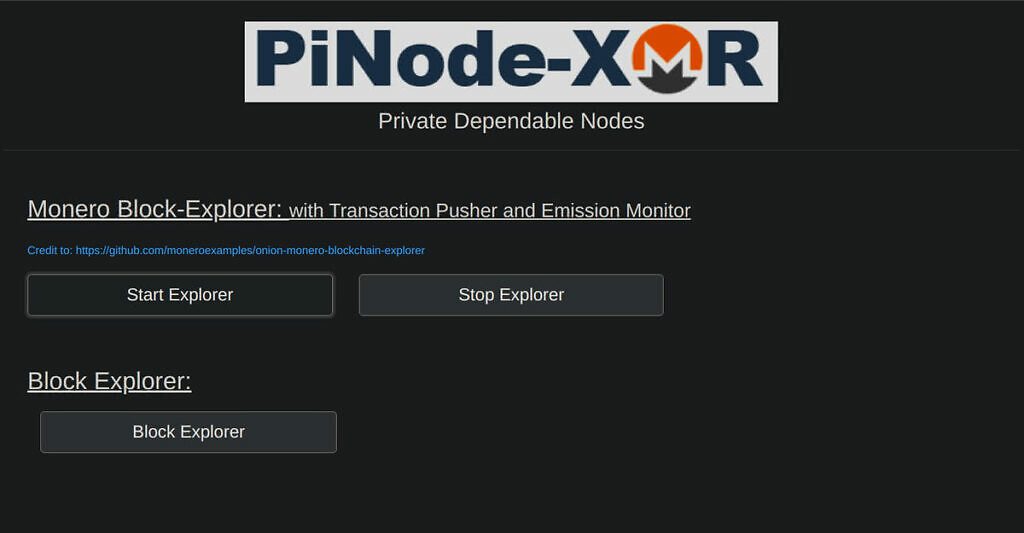
You also have access to your own personal Monero Explorer. Select "Block Explorer" from the dashboard menu, then press the "Start Explorer" button. After a few seconds, press the "Block Explorer" button below & PinodeXMR will forward you to your personal Monero Explorer.
Many other valuable tools are built into PiNodeXMR, including P2Pool Mining, Monero-LWS & I2P. There's far too much to detail here, but if you follow the guide, you should have a perfectly functioning Monero node running on the powerful RockPro64 single-board computer.
For more detailed information on the advanced features of PiNodeXM or software support, check out the official manual or ask in the PiNodeXMR Telegram Chat.
You can purchase a RockPro64 directly from Pine64's website.


